CANVAS TIPS
These are the tips that I have been sending out via email -- some are just basic tips, while others are in response to questions that have come up repeatedly. I will update the page periodically to add any new tips!
CANVAS TIP#21: Moving quizzes from Blackboard to Canvas.
In the recent “Blackboard End of Life Communication” email, you may have seen the “Migrating Tests, Surveys and Pools from Blackboard” link – this simply means you will create a special file in Blackboard containing your quiz information, then pull that file into Canvas.
PLEASE NOTE that there can be formatting issues when you migrate a quiz this way, mostly for those of you who have specialized formatting like graphs, charts, and equations.
The formatting issues can be minimized by taking one extra step in the quiz migration process: instead of taking your quiz straight from Bb >> Canvas, you can take the Quiz Bb >> Respondus >> Canvas. Using the Respondus software as an intermediate step helps to clean up many of the formatting issues.
If you are interested in using the Respondus software, check with your campus Instructional Technology support about Respondus license information.
Once you have Respondus, here are some helpful handouts:
|
Setting Up Respondus to Retrieve Tests/Surveys from Blackboard and Publish to Canvas (courtesy L. Zehr, CGCC)
Using Respondus to Retrieve Tests/Surveys from Blackboard and Publish to Canvas (courtesy L. Zehr, CGCC)
Using Respondus to Migrate your Tests from Blackboard to Canvas the (More) Efficient Way (courtesy N. Bernard, CGCC)
|
|
||||||
Be aware that Respondus is a PC-only software!
- CGCC: If you are a Mac user, or if you do not want to install it on your own computer, TSS will be installing the software on the PCs in CHOLLA201 for general faculty use.
CANVAS TIP#22: The "Assignment Mute" feature
Some instructors are finding that if they begin grading assignments as they are submitted but before the actual assignment deadline, the graded students then go into Canvas to re-submit their assignment.
Currently Canvas does not have a setting to limit the number of submissions (although you can set the assignment to be locked after the submission deadline), so another approach is to “mute” the assignment – this way the assignment grades will not show until you are finished with all of the grading, and then “unmute” the assignment.
Here are two Canvas Guides to help with the “mute” feature:
CANVAS TIP#23: How to get single spacing in the Canvas Editor.
Don't forget that the Canvas Guides are your best friend -- that's where I found the answer to this question!!
I’ve been giving some loooooong tips lately, so here’s a super-short one:
I’ve been giving some loooooong tips lately, so here’s a super-short one:
- In canvas, when you hit “enter” at the end of line in the editor, the default is that you get double-spacing.
- To create single spacing in the Rich Content Editor, press the shift+enter (or, if you are on a Mac, hit shift+return). This will create a line break instead of a paragraph break.
CANVAS TIP#24: Quiz Statistics
Check out this Canvas Guide, "Once I publish my quiz, what kinds of quiz statistics are available?"
In the Canvas Quiz Statistics, you can see:
In the Canvas Quiz Statistics, you can see:
- see the class distribution of each question
- highlights most-missed questions with bar graphs of students responses
- mean and standard deviation
- time to take the exam
- if you give multiple attempts, you can look at the statistics for all attempts, or just for the most recent attempt.
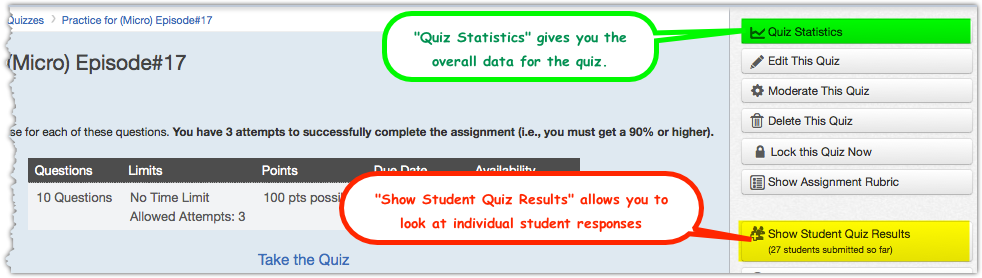
From the quiz, you can opt to look at individual student responses OR overall quiz results. In this case, I'm going for "Quiz Results."
|
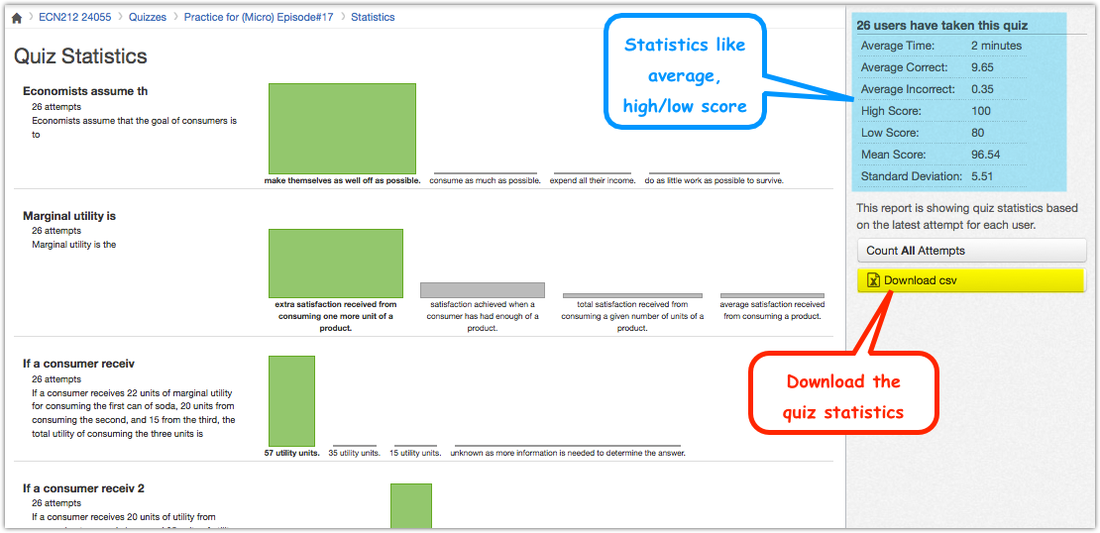
For each question, the green bar indicates the correct answer; the size of each bar is proportionate to the number of students that selected it. If you hover over each bar, you will see exactly what percentage of students selected that response!
|
CANVAS TIP#25: Giving a student additional time for an online quiz.
You can get the answer to this one straight from the Canvas Guides:
“Once I publish my quiz, how can I give my students extra time or extra attempts?“
NOTE: I have my homework “quizzes” set up so that students get three attempts on each one; I noticed that if your quiz has multiple attempts, you don’t get the option to give additional time.
“Once I publish my quiz, how can I give my students extra time or extra attempts?“
NOTE: I have my homework “quizzes” set up so that students get three attempts on each one; I noticed that if your quiz has multiple attempts, you don’t get the option to give additional time.
CANVAS TIP#26: Find the most-missed quiz questions.
| finding_the_most-missed_questions_in_canvas.pdf |
OK, this is long enough to be considered a tutorial rather than a tip, but here are TWO POSSIBLE METHODS to find the most-missed questions from a quiz you’ve given in Canvas:
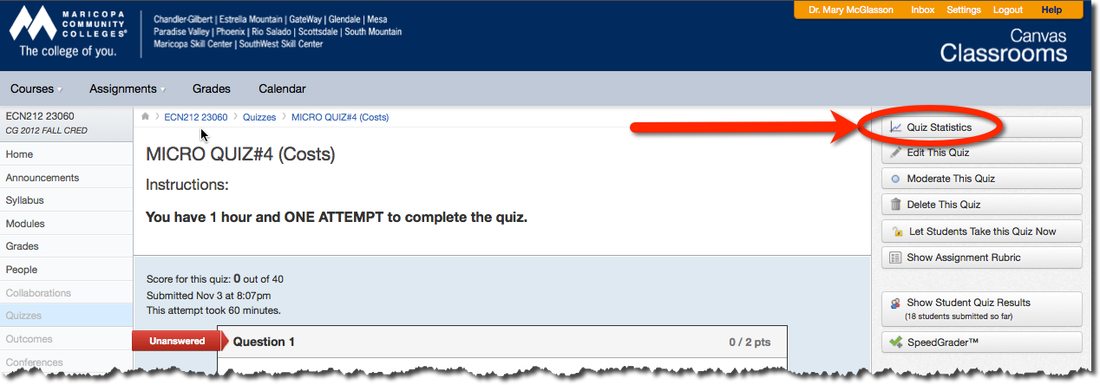
1. Eyeball it in “View Statistics.” In Canvas, navigate to the quiz that you want, and click the “Quiz Statistics” button that is on the right-hand side of your screen.
1. Eyeball it in “View Statistics.” In Canvas, navigate to the quiz that you want, and click the “Quiz Statistics” button that is on the right-hand side of your screen.
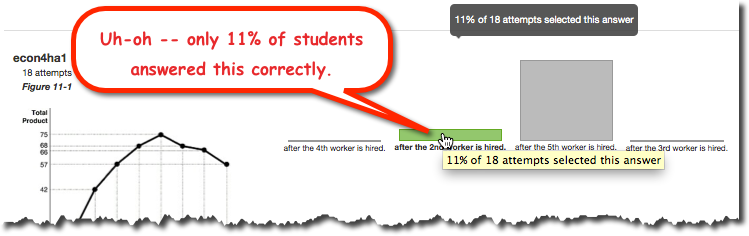
In Quiz Statistics, you will see a histogram of the responses that were submitted by students (the green bar is the correct response) for each question:
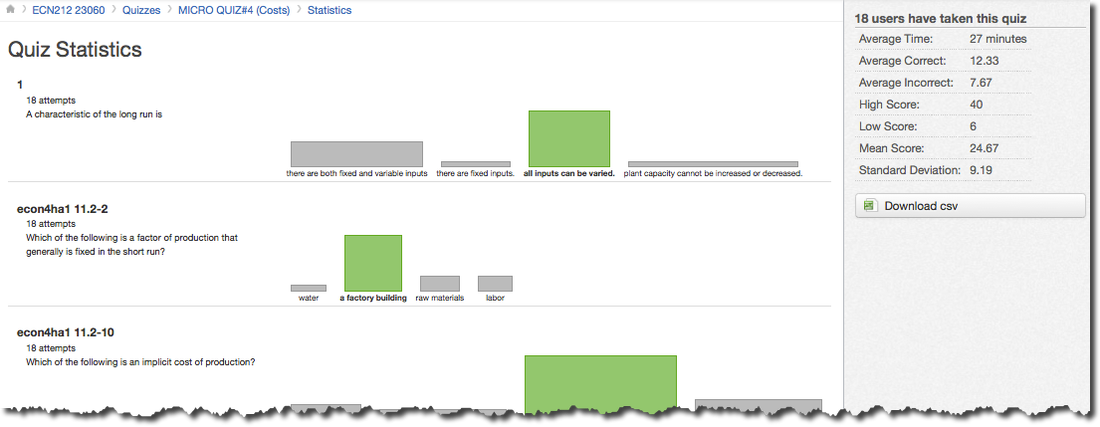
If you hover your cursor over each bar, you can see what percentage of the students chose that response. In particular, I go through and check the green bar (the correct answer) for each question. Here’s an example of a question that was missed by a lot of students:
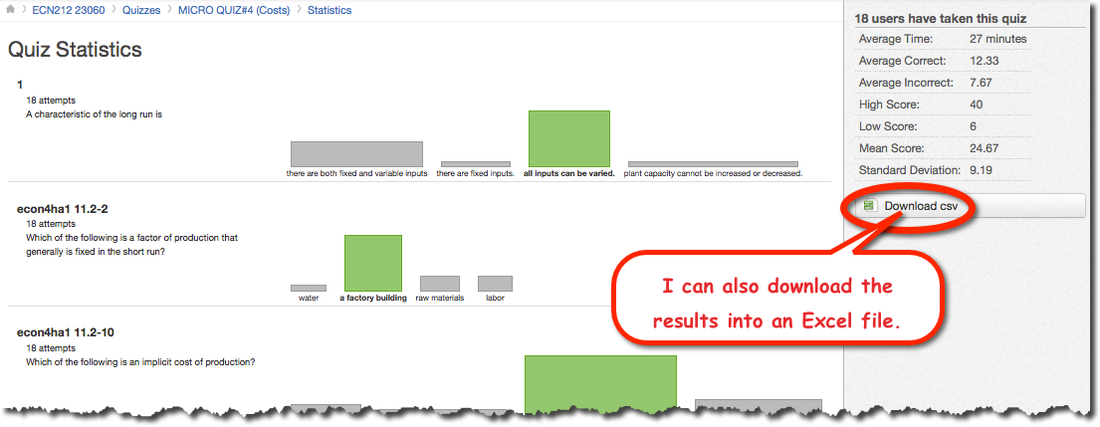
2. Download .csv results file. In the “Quiz Statistics” area, there is a “Download .csv” button on the right-hand side. Downloading the results as a .csv file allows you to manipulate that data in Excel (including finding the most-missed questions!).
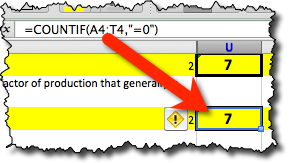
Do a “COUNTIF” formula to count the number of incorrect answers: = COUNTIF(range, criteria)
In this example, I wanted to count everything in the 4th row that had a value of “0” – i.e., those responses that got zero points because they were answered incorrectly. As you can see, there were a total of 7 incorrect responses for this question:
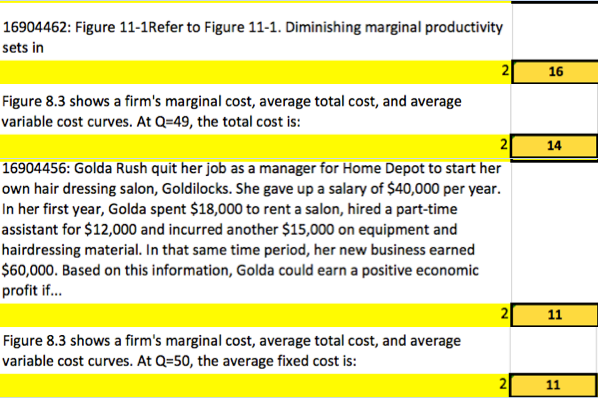
Here are my most-missed (missed by 16 students, 14 students, and 11 students, respectively):
CANVAS TIP#27: When will our courses be ready?
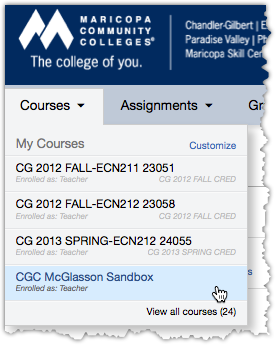
I had a question last week about when our Fall 2013 courses would be ready for us. For now, as soon as a course is created in SIS, it gets created in Canvas. This means that your Summer and Fall 2013 courses should be available right now (you can check by looking at the “Courses” pulldown in the upper left corner of your Canvas site).

Here you can see a list of my most-used courses. Notice in the bottom right corner, it says "View all courses"? That's actually where my Fall courses (which I'm not using yet) are hiding.
CANVAS TIP#28: Canvas Sandbox vs. Shell vs. Teaching Course
Adapted from materials created by our Course Production Specialist, Nonie Bernard:
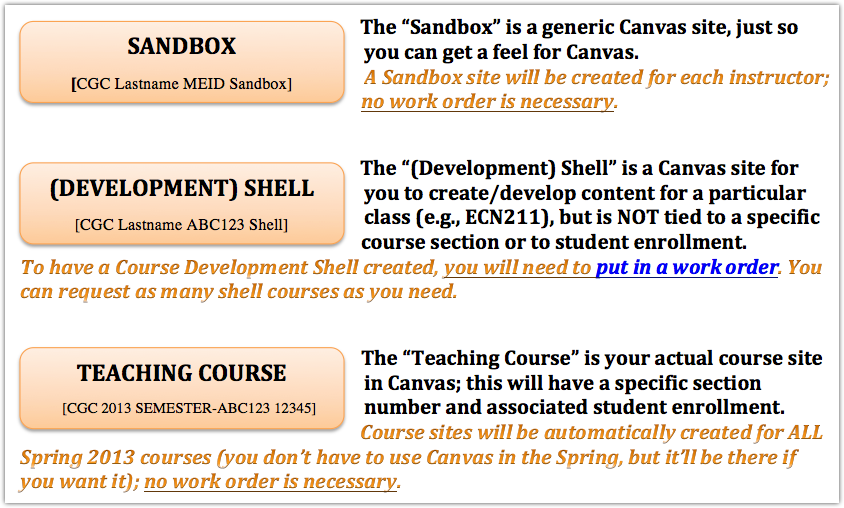
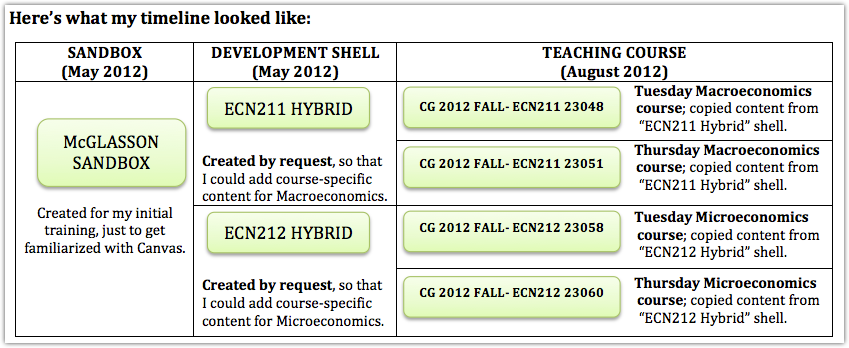
Every CGC instructor should have a SANDBOX COURSE. It is your learning center and playground for experimenting in Canvas. You will recognize it under the “Courses” heading in your global navigation area, because the name contains the word “Sandbox.” It is not tied to any semester, and it is yours to keep and use forever.
Every CGC instructor should have a SANDBOX COURSE. It is your learning center and playground for experimenting in Canvas. You will recognize it under the “Courses” heading in your global navigation area, because the name contains the word “Sandbox.” It is not tied to any semester, and it is yours to keep and use forever.
The course highlighted her in blue is my Sandbox.
SHELL COURSES are yours to develop your course content and keep it current. You can use your shell course(s) to develop your actual course content before you begin to teach in Canvas; and you can use them to maintain a "golden master" of your course content for any given course. Shell courses are not populated with students, and they are not tied to a semester; they are yours to keep and use forever.
You can request as many shell course(s) as you need: Canvas Shell Course Request
TEACHING COURSES are created automatically each semester for classes that have been scheduled in SIS (see Canvas Tip#27). These are the semester-, section-linked courses that you will use to teach your actual classes.
You can request as many shell course(s) as you need: Canvas Shell Course Request
TEACHING COURSES are created automatically each semester for classes that have been scheduled in SIS (see Canvas Tip#27). These are the semester-, section-linked courses that you will use to teach your actual classes.
CANVAS TIP#29: If you're going to make a mess, do it in your sandbox!
You are strongly advised to work on the development of your course materials in your Sandbox, or in a course shell, and then move the content over to your actual Teaching Course (which is super-easy to do) when everything is ready.
You ESPECIALLY don’t want to go messing with any big changes once your course is actually in progress (I’m not talking about a change like adding an assignment; I’m talking about messing around with settings if you don’t know exactly what the result will be…).
Trust me; last semester I thought I would try the “prerequisites” feature (you can set certain stipulations that a student cannot move on unless they have met certain criteria) while I was several weeks into the semester, and then started getting panicked emails from students because they couldn’t access ANYTHING!
I had to put everything back the way it was before, and make the changes in my shell course to start using the next semester. This semester I had it all set up in advance, and it's working great.

CANVAS TIP#30: No, seriously - Blackboard End of Life is June 30, 2013.
I have had more than one faculty member tell me that they had seen the June 30, 2013 end date for Blackboard, and could instructors still access Blackboard after that to move their content to Canvas?
The answer is absolutely, unequivocally, NO – THERE WILL BE NO ACCESS WHATSOEVER TO BLACKBOARD AFTER JUNE 30th. This means that we have just less than 3 months to get everyone – and their content – over to Canvas. But who’s counting….?
|
|

|
